Site Sponsors & Vendors
Page 1 of 2 12 LastLast
Results 1 to 10 of 18

Thread: DIY Tinted Tails

  1. #1
    Administrator Steve's Avatar
    Join Date
    Aug 2008
    Location
    Olympia,WA
    Posts
    2,360
    Post Thanks / Like

    Default DIY Tinted Tails

    Wrote this up on my blog but figured others may want to read it

    ----
    After my failed attempt with the film and seeing how rippin 6's had his professionally done to be TOTALLY BLACK i decided I needed something a little more drastic and get that same result.

    Seems like the most common method i read about was to get VHT Niteshades so i ordered 2 cans of it from a local place and 2 cans of Upol #1 clear-coat which from what I had read was a lot better than most any other and dried pretty quickly too.

    Goodbye normal clear taillights!


    To start with I made sure I had all the supplies I needed:


    • 10mm Socket & wrench
    • 1 'big' can of VHT Niteshades ( just used a bit of the 2nd one)
    • 1 can of Upol #1 (hey at least I got spares )
    • 1000 grit sandpaper
    • 1500 grit sandpaper


    Obviously the first step is to get the taillights out. This process is actually very straightforward.
    Simply remove the plastic section that covers the trunk lock by unscrewing the 4 hooks that are used to hold the trunk-net in place and then it lifts right up.

    After that it's simply a matter of popping out the push pins that hold the trunk liner up so you can get to the lights. It may help to take out the trunk bottom liner since that tends to get in the way.


    Once you see the lights there is a large white connector that disconnects by pressing the center tab.


    After they lights are disconnected it's a simple matter of using the 10 mm socket to undo the 3 nuts that hold the light in place.


    Ok now we get to the real work: First I used 1000 grid wet sandpaper to scuff up the surface of the light. Talk about a cringe worthy moment.. There's no going back now!

    I then taped them up with some old wrapping paper to protect the rest of the housing from the paint.


    Now came the part where I screwed up:

    a) I did it outside (well i was 'kicked out' ) and it was a little windy
    b) I was trying to rush it.
    c) At this point in my life I should've learned that I do NOT have any painting skills what-so-ever, even if it's spray paint

    Whatever you do ; DO NOT RUSH THESE NEXT STEPS

    So on go the first coat(s) of Niteshades. I did two real light misting to avoid runs. Really it's not that noticable if anything it almost seems like stock again minus the scratches.


    Just keep adding layers when the previous ones dry (5-10 minutes) spraying from about a foot away. Niteshades is runny stuff and you don't want to spray from too close or get it on too thick (ask me how I know haha) !

    If you get runs wait for it to dry and then sand it down. I was rushing and sometimes the paint wasn't 100% dry.. OUCH.. big mess!

    On the left you can see one with probably a good 5-6 layers on it while i had to resand the one on the right because of major drips.


    Both are looking pretty dark/about the same now. REALLY if you can try to spray both exactly the same in the same pass. I was an idiot and didn't - so now one light is slightly darker than my other (you can only tell with my lights on).


    After it was all dark enough (finished 1 can of niteshades) I sanded again but with 1000 and then 1500 grid. Notice the spots where I screwed up with my runs. Was too rushed to try to fix it anymore (once again. Don't be in a rush when doing this)


    Then the clear coat went on - same process : 2 thin mist coats and then just piling on the layers every 5-10 minutes. Once I got about 5-6 thick layers on it was good enough and i let it dry and then sanded it with 1500 sandpaper again. Notice all the runs from not taking my time!! (yeah it looks like CRAP right now)


    After putting them back into the car the process of cleaning up the mess started.

    First a layer of 3m Rubbing compound, Then scratch-X and finally a couple of coats of wax. I HIGHLY recommend a buffer for this. I did it by hand and it took forever , and the entire time I was thinking I had just gone and ruined my taillights because they wouldn't buff out.
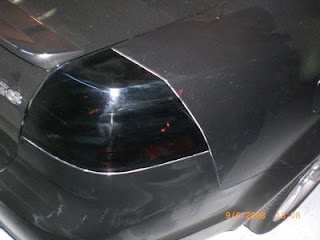
    (wouldn't you think the same seeing these? btw my car is panther black metallic - the flash just makes it look gray in certain shots)
    -= R.I.P Charlie =-
    2008 Panther Black G8 GT 888 Edition #470
    Texas-Speed 418 LS3, Patrick G 234/242 114LSA+2 Cam & Livernois Ported Heads & Valve-job, Roto-Fab CAI & Radiator Cover, Fasterproms Ported TB & Manifold, ECM/TCM Tune by PatrickG, 1-7/8" American Racing Headers, Circle-D 258mm 2800rpm Converter, Powerbond 25% Pulley, Pedders xA Street II Kit, HSV VE GTS Fenders, HSV VE GTS 20" Wheels (285/30 & 245/35), 20% Tint, Holden Rear Sunshade, Empty Wallet Mod(tm)
    http://g8gt.blogspot.com

  2. #2
    Administrator Steve's Avatar
    Join Date
    Aug 2008
    Location
    Olympia,WA
    Posts
    2,360
    Post Thanks / Like

    Default

    After taking a break though (rest of the day because I was so depressed thinking for sure I had ruined my lights! haha) I really got into and buffed them out to a nice shine using a LOT of rubbing compound & scratch-X. Took a while but the result is 'acceptable'. Here's the final result (Yeah I know - i need to take some better pictures that don't look so dark or make the car look gray! )


    Tail lights on:


    Blinkers on (see how the right one is darker)


    Brakes On:


    With the lights off they basically look BLACK except when the sun is right on them, then you can see some red from the actual light shining through. With the lights on, during the daytime if it's really sunny sometimes it's a bit hard to see the blinkers (because I really overdid it with the niteshades - could've stopped 2 layers sooner and still have it be the same darkness At night though (should take some pics) the lights are quite bright enough and everything shows up just fine.

    I MAY one day get them professionally done instead but for now i'm quite content with how they turned out even though i had some moments where I thought for sure they were ruined.
    -= R.I.P Charlie =-
    2008 Panther Black G8 GT 888 Edition #470
    Texas-Speed 418 LS3, Patrick G 234/242 114LSA+2 Cam & Livernois Ported Heads & Valve-job, Roto-Fab CAI & Radiator Cover, Fasterproms Ported TB & Manifold, ECM/TCM Tune by PatrickG, 1-7/8" American Racing Headers, Circle-D 258mm 2800rpm Converter, Powerbond 25% Pulley, Pedders xA Street II Kit, HSV VE GTS Fenders, HSV VE GTS 20" Wheels (285/30 & 245/35), 20% Tint, Holden Rear Sunshade, Empty Wallet Mod(tm)
    http://g8gt.blogspot.com

  3. #3
    Vendors Greg@PacePerformance's Avatar
    Join Date
    Aug 2008
    Location
    Boardman, Ohio
    Posts
    3,192
    Post Thanks / Like

    Default

    Very nice Steve. Good to see you didn't need to buy new tails
    888-748-4655
    All Prices in posts are subject to change at anytime.
    Check us out at www.PacePerformance.com

    2009.5 Liquid Red G8 GT
    2009 MSM Supercharged G8 GXP M6 - 11.51 @ 126.09
    586rwhp/495tq

  4. #4
    Administrator Steve's Avatar
    Join Date
    Aug 2008
    Location
    Olympia,WA
    Posts
    2,360
    Post Thanks / Like

    Default

    yeah I think i can last on these for a while - but if I do decide to get them professionally done i'll order that set anyway so I won't be without
    -= R.I.P Charlie =-
    2008 Panther Black G8 GT 888 Edition #470
    Texas-Speed 418 LS3, Patrick G 234/242 114LSA+2 Cam & Livernois Ported Heads & Valve-job, Roto-Fab CAI & Radiator Cover, Fasterproms Ported TB & Manifold, ECM/TCM Tune by PatrickG, 1-7/8" American Racing Headers, Circle-D 258mm 2800rpm Converter, Powerbond 25% Pulley, Pedders xA Street II Kit, HSV VE GTS Fenders, HSV VE GTS 20" Wheels (285/30 & 245/35), 20% Tint, Holden Rear Sunshade, Empty Wallet Mod(tm)
    http://g8gt.blogspot.com

  5. #5
    Moderator, Retired -Ray-'s Avatar
    Join Date
    Aug 2008
    Location
    San Antonio, TX
    Posts
    20,438
    Post Thanks / Like

    Default

    Nice work Steve. I had tinted tails on my G6, they looked pretty good.
    Rest in Peace Charlie!

    Sold


    Just a GT


    Quote Originally Posted by RichsGreyGT View Post
    this site is hardcore modding central.

  6. #6
    VIP Member
    Join Date
    Aug 2008
    Location
    Lethbridge
    Posts
    921
    Post Thanks / Like

    Default

    Those are dark! Looks pretty sweet.
    2009 G8 GT::Panther Black

  7. #7
    Member Gearhead's Avatar
    Join Date
    Oct 2008
    Location
    Chicago Burbs
    Posts
    62
    Post Thanks / Like

    Default

    Looks great.

    Jim

  8. #8
    LOST BUT NEVER FORGOTTEN GRRRR8's Avatar
    Join Date
    Aug 2008
    Location
    Sugar Land Texas
    Posts
    15,917
    Post Thanks / Like

    Default

    I like!
    2008 Liquid Red Pontiac G8 Sport/Premium - Adams Polishes - American Racing Headers - ARP - BMR Fabrication - Circle D Specialties - COMP Cams - Crazy Paul - Dynojet - Earl's - Flowmaster - Fuel Air Spark Technology - G2 - GFORCE 1320 - Greg Weld - HP Tuners - JBA - Lingenfelter - Maverick Man Carbon - Metco Motorsports Solutions - Mickey Thompson - M&H - Mike Norris Motorsports - NGK - Pace Performance - Pedders USA - Powerbond - PSI - Russell - SBX Performance - SJM Manufacturing - SPOHN Performance - Tony Mamo - Vararam - Vector Motorsports - Wretched Motorsports - 470 RWHP 427 TQ - Engine Tune By Patrick G

  9. #9
    Moderator, Retired -Ray-'s Avatar
    Join Date
    Aug 2008
    Location
    San Antonio, TX
    Posts
    20,438
    Post Thanks / Like

    Default

    Charlie, where have you been? Steve posted this almost 2 weeks ago. LOL
    Rest in Peace Charlie!

    Sold


    Just a GT


    Quote Originally Posted by RichsGreyGT View Post
    this site is hardcore modding central.

  10. #10
    Administrator Steve's Avatar
    Join Date
    Aug 2008
    Location
    Olympia,WA
    Posts
    2,360
    Post Thanks / Like

    Default

    Did headlights too (with covers)
    http://forum.grrrr8.net/showthread.php?p=11309
    -= R.I.P Charlie =-
    2008 Panther Black G8 GT 888 Edition #470
    Texas-Speed 418 LS3, Patrick G 234/242 114LSA+2 Cam & Livernois Ported Heads & Valve-job, Roto-Fab CAI & Radiator Cover, Fasterproms Ported TB & Manifold, ECM/TCM Tune by PatrickG, 1-7/8" American Racing Headers, Circle-D 258mm 2800rpm Converter, Powerbond 25% Pulley, Pedders xA Street II Kit, HSV VE GTS Fenders, HSV VE GTS 20" Wheels (285/30 & 245/35), 20% Tint, Holden Rear Sunshade, Empty Wallet Mod(tm)
    http://g8gt.blogspot.com

Posting Permissions

  • You may not post new threads
  • You may not post replies
  • You may not post attachments
  • You may not edit your posts
  •