


I'm creating this thread to offer up a bit of help to those wanting to do this installation. Anyone else is welcome to post up any tips or tricks they've come up with themselves. But here I'm just going to post up what I've found.
First steps are...
- Remove your wheels
- Remove the stock calipers and set them atop your upper arms. Don't remove the caliper from the line yet. You may want to push the piston back into the caliper to reduce the amount of fluid still in the caliper. Feel free to remove the pads, as you won't need them again.
- Remove your stock rotor. It's held on only by the wheel and caliper (assuming the parking brake is off), so with both removed, it will come off. It may be rusted to the hub, in which case a rubber mallet applied liberally to its backside will eventually get it loose.
You've now exposed your stock parking brake shoe and adjuster. No need to remove either the hub or the parking brake cable on the backside for any of this.
Removing the Stock Shoe
- At the bottom of the shoe is a small gray cylinder that is your adjuster/actuator. The shoe itself sits in two grooved plates on either side of the actuator. The half facing the front of the car will have a small toothed ring on it, which is your adjuster. Clockwise extends the adjuster, tightening the parking brake. Counter-clockwise retracts it. So using a set of pliers or a flathead screwdriver, relax it all the way.
- Press the stock parking brake shoe up from the bottom. It should slide upward and stop before hitting the hub, while still remaining in the grooves on the actuator. Now the fun part. There's a retaining spring behind the hub face. Pressing the shoe up as far as it will go lets you get a screwdriver between the hub and the shoe itself to pry the spring free of the retainers that are in the brake guard. Pictures!
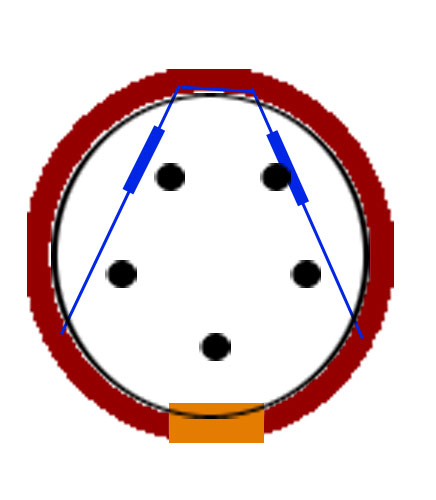
Below is a quick-and-dirty diagram I made. In the diagram below, the red circle is the stock shoe, the orange rectangle is the adjuster/actuator, the black circles and dots are your hub face and spindles, and the blue lines are the retaining spring set behind your hub face. The thicker rectangles on the lines roughly demonstrate the location of the two retaining clips that are holding the spring in place. You'll want to pry away from the axle to get the springs loose. The ends and top of the spring simply rest inside the shoe and are not actually attached to the shoe by anything other than the tension of the spring.
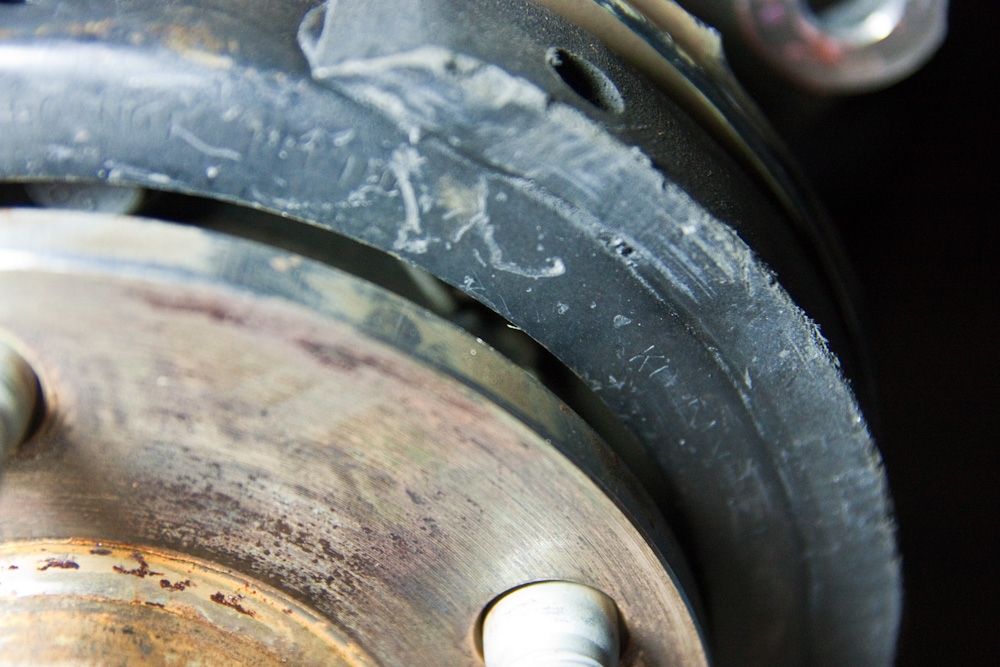
A shot between the hub face and brake shoe of the right-side clip.
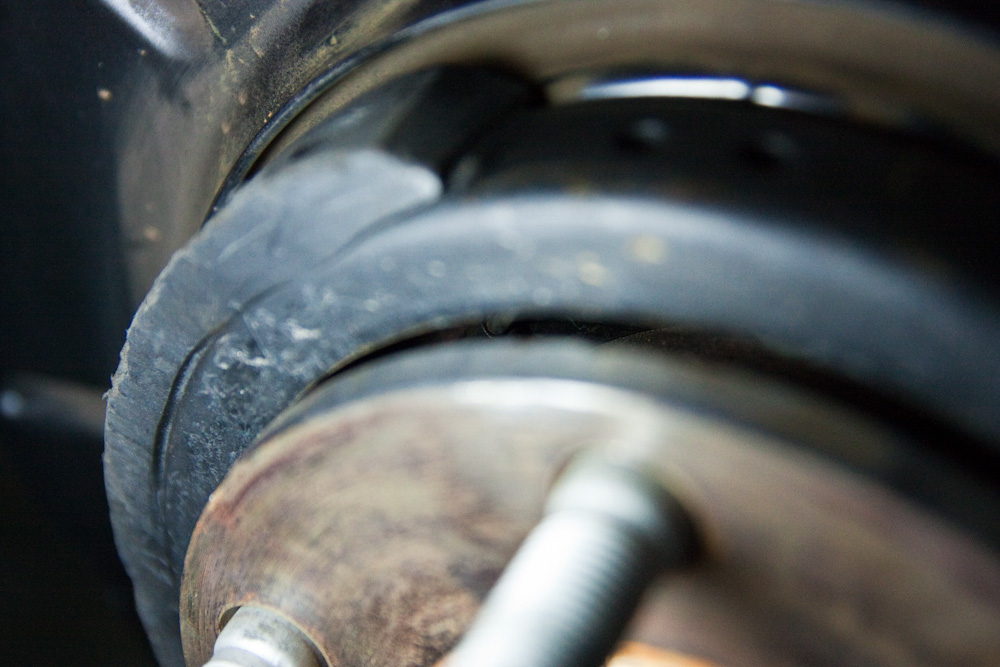
Left-side clip.
Note that both of these pictures were taken on the same side of the car. There are two retaining clips for each spring.- Once you've pried the spring loose, lift up on the shoe again and it will slide further. Now pull it away from the brake assembly and it should rotate from the bottom. You can now get a screwdriver in behind it to pry the spring loose one side at a time. It's not clipped into the shoe; it's only held there by its own tension. Once the spring is out, the shoe is nearly free.
- Without pushing the shoe back into place - that is, leaving it hanging half-off as it now is - push the shoe back down a bit. Not in, against the spindle, but down, against the hub face. Now get your screwdriver down near the bottom of the shoe and pry it out one side at a time.
- Congrats, the stock shoe is off!
Installing the New Shoe
The process is the same as the removal, but in reverse.
- Place the shoe over the hub face and use your screwdriver to pry it apart so that it will fit over the hub and into the shoes on the actuator.
- Then pull it up and away from the spindle to give yourself room to insert the spring.
- Press it back against the spindle, then down just a bit and work your screwdriver between the hub face and shoe to reseat the spring on the clips. You will have noted that the clips are different sizes so that the spring will only fit one way. If you get it wrong, just pull the top of the shoe back up and away from the spindle, remove the spring, and reseat it.
- Your new shoe is on!
Adjusting the Parking Brake
Now it's time to adjust the brake. Speaking with Greg while I was in the middle of it, I found his advice to be the best. Following it to the letter the second time around got me a perfectly functioning e-brake.
NOTE: Before you can perform this step, you'll need to trim the heat shield so that it doesn't rub against your new rotor. Tin snips or a nibbler will do the trick. The only thing you need to trim off is the lip, plus a little space at the top for your caliper to fit. It helps to have already mounted the brackets to the calipers so you can hold them up to get an idea of where they'll sit.
But back to adjusting the brake...
- Tighten the parking brake adjuster a few clicks.
- Fit your rotor onto the hub and, with your car in neutral, give the rotor a few turns by hand.
- If it turns freely, remove the rotor and return to step 1. Otherwise, continue to step 4.
- If you are unable to seat or turn the rotor, remove it and loosen the adjuster a single click. Then return to step 2.
- When the rotor turns, but tangibly binds, you've reached the correct adjustment. It shouldn't be difficult to turn, but there should be more effort than a free turn.
- Now remove the rotor on the side you just worked on and do the other side. This way your work on the first side doesn't interfere with how easily the other side turns, which may foul your adjustment.
When the above is done, you may safely install both rotors and mount your new calipers as per the instructions provided by Greg in his kit. Once the calipers are in place, now switch the brake line over to the new calipers - using new copper washers on either side of the line - and then tighten the banjo bolt down to 25 lb ft. Clean up any spilled brake fluid immediately to prevent damage to painted parts. Install the pads with your pin kits, bleed the rear brakes, and you're ready to go!
EDIT: You'll definitely want to install your new pads first to ensure that your pistons don't overextend during the bleeding process. Otherwise you may run your master cylinder dry. Ask me how I know.
Parts List
Greg@PacePerformance is your man for most things rear Brembo kit related. I got everything but the rotors and pads through him, but that's been a while. Here are the list of parts you'll need and the quantity you'll need:
- 2x Brembo Caliper Pin Kit
- 1x Caliper Adapter Bracket Kit
- 1x Left Rear Caliper: CTS-V or Camaro. The calipers are identical. Only the paint and price differ.
- 1x Right Rear Caliper: CTS-V or Camaro. Same as above.
- Optional: Greg can ship your calipers to Mike@ThePowderCoater to have them coated any color of your choice. He coated mine and even put a Brembo label on; the work is flawless. Cost is currently just under $200.
- If you want to keep your e-brake, you'll also need the modified Parking Brake Shoes which allow the shoe to fit the larger inner hub diameter of the Camaro rotor.
- Optional, but probably a good idea: new copper washers for the brake line connection to the caliper. You'll need to PM Greg for these.
The pin kits and calipers you can get from Greg. The rear caliper brackets you may be able to get from Andy@Squash. He's also supposed to be making brake shoes, but so far nothing has been forthcoming. So you may have to rig something.
Finally, you will need the rear rotors and pads for a Camaro. The stock G8 pads and rotors will not work, no way, no how. You can also get those through Greg (via PM), or you can get them... Well, anywhere, really. You can also buy any brand of pad or rotor manufactured for the rear of the 2010 Camaro SS (must be made for the SS, as the LT/V6 uses sliding/floating calipers). To wit, I purchased dba rotors and Hawk HPS pads for mine from MarylandSpeed.

 Reply With Quote


